Learn how to build a thriving bioactive vivarium for leopard geckos or crested geckos this spring. This step by step guide covers substrate layering, cleanup crew species, live plants, climate control, and a month by month establishment timeline.
Key Takeaways
- A bioactive vivarium uses living organisms (plants, microfauna, beneficial bacteria) to create a self-cleaning, naturalistic habitat for your gecko.
- Spring is the ideal time to start because rising ambient temperatures and longer daylight hours help live plants and cleanup crews establish faster.
- Leopard geckos and crested geckos need very different humidity and temperature ranges, so substrate mixes, plant choices, and drainage layers must be tailored to each species.
- A well built bioactive setup typically takes 4 to 8 weeks to fully cycle before introducing your gecko.
- Ongoing monitoring of temperature gradients, humidity, and microfauna health is essential for the first 3 months.
What Is a Bioactive Vivarium and Why Choose One?
A bioactive vivarium is an enclosed habitat that mimics a slice of natural ecosystem. Instead of relying solely on spot cleaning and full substrate changes, it incorporates live plants, a drainage layer, and a "cleanup crew" of small invertebrates that break down waste, shed skin, and decaying organic matter. The result is a more stable microclimate, reduced odour, and a richer environment for the animal living inside it.
For gecko species commonly kept as pets, particularly leopard geckos (Eublepharis macularius) and crested geckos (Correlophus ciliatus), bioactive setups offer meaningful welfare benefits. Veterinary and herpetological guidelines increasingly recognise that environmental complexity supports natural behaviours such as digging, climbing, and exploring. A bioactive vivarium delivers that complexity while also reducing the frequency of deep substrate changes, which can be stressful for the animal.
If you are budgeting for your first exotic pet setup, you may find it helpful to review the New Pet Budget 2026: First Year Cost Breakdown to plan your spending across equipment, substrate, and veterinary wellness checks.
Preparation: What You Need Before You Start
Enclosure Size
For a single adult leopard gecko, a front opening enclosure of at least 90 x 45 x 45 cm (roughly 36 x 18 x 18 inches) is recommended by most reptile welfare organisations. Crested geckos, being arboreal, benefit from taller enclosures: a minimum of 45 x 45 x 60 cm (18 x 18 x 24 inches) with vertical climbing space. Larger is always better when space allows.
Equipment Checklist
- Drainage layer material: Lightweight expanded clay aggregate (often sold as clay balls or hydro balls), approximately 2.5 to 5 cm deep.
- Mesh separator: A fine, non metallic mesh sheet to sit above the drainage layer and prevent substrate from sinking.
- Substrate components: Organic, fertiliser free topsoil; coco fibre (coconut husk fibre); sphagnum moss; sand (for leopard gecko mixes only, use play sand or calcium based sand alternatives).
- Leaf litter: Dried oak, magnolia, or Indian almond leaves.
- Cork bark, branches, and hides: For climbing (crested gecko) or ground level shelter (leopard gecko).
- Live plants: Species appropriate selections (see plant section below).
- Cleanup crew cultures: Tropical springtails (Collembola spp.) and tropical woodlice/isopods (commonly Porcellio or Trichorhina tomentosa, known as dwarf white isopods).
- Thermostat and thermometer/hygrometer combo: Digital, with probes placed at both the warm and cool ends of the enclosure.
- Heating element: A thermostat controlled heat mat or overhead ceramic heat emitter for leopard geckos; low wattage overhead heating or ambient room temperature management for crested geckos.
- Lighting: A low level UVB tube (shade dweller or 5 to 7 percent UVB for leopard geckos, 2 to 5 percent for crested geckos) plus a daylight LED for plant growth.
- Spray bottle or misting system: Manual or automatic, depending on your budget.
Step by Step: Building the Bioactive Vivarium
Step 1: Drainage Layer
Rinse your clay aggregate balls thoroughly in dechlorinated water and spread them evenly across the enclosure floor to a depth of about 2.5 to 5 cm. This layer prevents waterlogging by allowing excess moisture to drain away from the substrate above. For crested gecko setups, where higher humidity is maintained, a slightly deeper drainage layer (closer to 5 cm) helps prevent stagnant conditions.
Step 2: Mesh Barrier
Cut a sheet of fine mesh to fit the interior footprint of the enclosure and lay it flat over the drainage layer. This barrier stops substrate particles from filling the gaps in the drainage layer over time. Avoid using metal mesh as it can corrode in humid conditions; fibreglass or plastic window screen mesh works well.
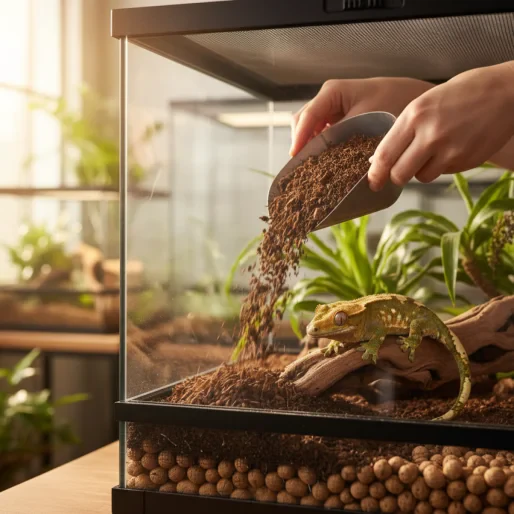
Step 3: Substrate Mixing and Layering
The substrate mix differs between species because of their different natural habitats.
Leopard gecko (arid bioactive mix): Combine roughly 40 percent organic topsoil, 30 percent play sand, 20 percent coco fibre, and 10 percent sphagnum moss by volume. The goal is a substrate that holds a slight amount of moisture in the lower layers but stays dry on the surface. Aim for a total depth of 7 to 10 cm to allow burrowing.
Crested gecko (tropical bioactive mix): Combine roughly 50 percent organic topsoil, 30 percent coco fibre, and 20 percent sphagnum moss by volume. This mix retains more moisture throughout, supporting higher ambient humidity. Layer it to a depth of 5 to 8 cm.
In both cases, mix the components in a large bucket or bin before adding them to the enclosure. Lightly mist the mix so it is damp but not dripping when squeezed.
Step 4: Hardscape and Hides
Before planting, position your hardscape elements. For leopard geckos, focus on ground level hides (at least one on the warm end and one on the cool end), flat stones for basking, and low cork bark pieces. For crested geckos, install vertical cork bark tubes, branching sticks at various heights, and suspended coconut hides or magnetic ledges. Secure any heavy items so they cannot shift and injure the animal.
Step 5: Planting
Choose plants suited to the humidity and light levels of each setup (see the plant selection section below). Dig small holes in the substrate, remove plants from their pots, gently rinse the roots free of any commercial fertiliser or perlite, and press them into position. Water lightly after planting.
Step 6: Leaf Litter and Surface Layer
Scatter a generous layer of dried leaves across the substrate surface. Leaf litter serves multiple purposes: it provides hiding spots for the cleanup crew, maintains surface moisture, breaks down slowly to feed the soil biology, and creates a more natural visual environment. For leopard gecko setups, keep the leaf litter slightly thinner to allow the surface to dry between misting. For crested gecko setups, a thicker layer helps maintain humidity.
Step 7: Introducing the Cleanup Crew
Add your springtail and isopod cultures directly onto the substrate surface, concentrating them near areas of leaf litter and moisture. A good starting population for a standard enclosure is around 50 to 100 springtails and 15 to 25 dwarf white isopods. They will breed and self regulate their population based on available food.
Important: Do not introduce your gecko at this stage. The vivarium needs time to cycle.
Cleanup Crew Species: Choosing the Right Invertebrates
The cleanup crew is the engine of a bioactive system. These tiny organisms consume gecko waste, shed skin, decaying plant matter, and mould, converting it into nutrients the plants and soil microbiome can use.
Springtails (Collembola spp.)
Tropical springtails are the most universally recommended cleanup species. They thrive in moist substrate, feed on mould and fungi, and reproduce quickly. They are especially valuable in crested gecko setups where higher humidity can encourage mould growth. In arid leopard gecko vivaria, springtails concentrate in the moister lower substrate layers and around water dishes.
Dwarf White Isopods (Trichorhina tomentosa)
These tiny, soft bodied isopods are ideal for both leopard gecko and crested gecko environments. They stay small (around 2 to 3 mm), burrow readily, and are prolific breeders in warm, moist substrate. They are also safe if accidentally ingested by the gecko.
Dwarf Purple Isopods (Trichoniscus pusillus)
Another small species suitable for bioactive setups, particularly in slightly cooler or more temperate vivariums. They are less prolific than dwarf whites but can complement a mixed crew.
Larger Isopods: A Caution
Larger isopod species such as Porcellio scaber or Porcellio laevis can work in bioactive gecko enclosures, but they sometimes nibble on delicate live plants or compete with smaller species. Most keepers find dwarf species more reliable for gecko vivaria.
Live Plant Selection
For Leopard Gecko Vivaria (Arid Tolerant)
- Aloe vera (small varieties): Tolerates dry conditions, low water needs.
- Haworthia species: Compact succulents that thrive in indirect light.
- Sansevieria (snake plant, small cultivars): Hardy, tolerates low humidity.
- Tillandsia (air plants): Can be mounted on cork bark; require occasional misting only.
- Sedum species: Low growing ground cover succulents.
For Crested Gecko Vivaria (Tropical)
- Pothos (Epipremnum aureum): Extremely hardy trailing plant; tolerates low light and high humidity. A staple in tropical bioactive setups.
- Ficus pumila (creeping fig): Climbs cork bark and glass; provides excellent cover.
- Bromeliads (small species such as Neoregelia): Hold water in their central cup; add visual interest and microhabitats.
- Philodendron (small species): Lush foliage, handles humidity well.
- Ferns (bird's nest fern, button fern): Thrive in indirect light and moist conditions.
- Sphagnum moss (live): Can be used as ground cover in humid corners.
Plant safety note: Always verify that any plant species is non toxic to reptiles before adding it to the enclosure. Avoid plants treated with systemic pesticides or chemical fertilisers. Rinsing roots thoroughly before planting helps remove residual chemicals.
Humidity and Temperature Balancing
This is where many first time bioactive keepers run into difficulty. The most common mistake is treating humidity and temperature as separate variables when they are deeply interconnected: raising temperature lowers relative humidity, and adding moisture without adequate ventilation creates stagnant, harmful conditions.
Leopard Gecko Parameters
- Warm end (basking zone): 28 to 32 degrees Celsius (around 82 to 90 degrees Fahrenheit), measured at substrate level.
- Cool end: 22 to 25 degrees Celsius (around 72 to 77 degrees Fahrenheit).
- Ambient humidity: 30 to 40 percent across most of the enclosure.
- Moist hide: A single enclosed hide with damp sphagnum moss inside, providing a localised humidity of 60 to 70 percent. This is critical for healthy shedding.
Crested Gecko Parameters
- Daytime temperature: 22 to 26 degrees Celsius (around 72 to 79 degrees Fahrenheit). Crested geckos are sensitive to heat; sustained temperatures above 29 degrees Celsius (around 84 degrees Fahrenheit) can cause serious stress or heat related illness.
- Night drop: A gentle decrease to 18 to 22 degrees Celsius (around 65 to 72 degrees Fahrenheit) is beneficial and mimics natural conditions.
- Humidity cycle: Mist heavily in the evening to raise humidity to 70 to 80 percent, allowing it to dry down to around 50 percent during the day. This wet/dry cycle prevents respiratory issues associated with constant high humidity.
Practical Tips for Climate Control
- Use a thermostat on all heat sources without exception. Unregulated heat mats or lamps are a leading cause of thermal burns in reptiles.
- Place digital hygrometer probes at animal height, not at the top of the enclosure where readings will be misleading.
- In spring, ambient room temperatures often fluctuate as outdoor weather changes. Monitor enclosure temperatures more frequently during April and May until conditions stabilise.
- Ventilation is critical. Enclosures with solid glass tops trap moisture; ensure adequate mesh ventilation panels or leave partial gaps in screen topped setups to allow air exchange.
For those who enjoy tech based monitoring solutions, the principles behind Pet Wearable Heart Monitors for Dogs and Cats are similar: consistent data logging helps you spot trends before they become emergencies. Some reptile keepers now use wifi enabled temperature and humidity loggers for the same reason.
Month by Month Establishment Timeline
Week 1 to 2: Build and Plant (Before Adding Your Gecko)
Assemble the vivarium following the steps above. Install all heating and lighting equipment and run it for at least 48 hours before planting to confirm that temperature gradients are correct. Plant your chosen species, add leaf litter, and introduce the cleanup crew. Mist according to the species parameters. Do not add the gecko yet.
Week 3 to 4: The Cycling Period
During this phase, the soil microbiome is establishing itself. Springtails and isopods are acclimating and beginning to breed. You may notice small patches of mould on leaf litter or cork bark; this is normal and usually a sign that the cleanup crew has not yet reached full capacity. Springtails will consume it. Continue misting on schedule. Check that plants are rooting and not wilting. Replace any that fail.
Month 2 (Weeks 5 to 8): Introduction
Once temperatures and humidity are stable, plants are showing new growth, and the cleanup crew is visibly active (you should see springtails on the surface after misting, and isopods under leaf litter when you lift a leaf), the vivarium is ready. Introduce your gecko calmly, ideally in the evening when the animal is naturally more active. Provide hides and do not handle the gecko for the first 5 to 7 days to allow settling.
Month 3 (Weeks 9 to 12): Monitoring and Adjustment
Observe how the system responds to the presence of the gecko. Waste should begin disappearing within 24 to 48 hours as the cleanup crew processes it. If waste accumulates, the crew may need supplemental feeding (a small piece of vegetable such as carrot or courgette placed on the substrate surface) to boost their population. Check plants for damage; leopard geckos occasionally trample low growing species, and crested geckos may bend delicate stems. Rearrange or replace plants as needed.
Months 4 to 6: Maturation
By this stage, a well established bioactive vivarium largely maintains itself. Routine tasks include:
- Spot checking temperature and humidity daily.
- Misting on schedule (once every 2 to 3 days for leopard geckos, daily evening misting for crested geckos).
- Removing uneaten food promptly (within 12 hours for fresh fruit mixes in crested gecko setups).
- Trimming or pruning plants that outgrow their space.
- Adding fresh leaf litter every 4 to 6 weeks as the old layer decomposes.
- Topping up the cleanup crew if populations seem low, which is uncommon in a healthy system.
What to Watch for: Warning Signs
- Persistent mould that does not resolve within 2 weeks: May indicate insufficient ventilation or an undersized cleanup crew. Increase airflow and add more springtails.
- Substrate smells sour or ammonia like: The drainage layer may be waterlogged, or the bioactive cycle has stalled. Reduce misting immediately and check the drainage layer for standing water.
- Gecko spending excessive time in the moist hide or soaking in the water dish: Could signal that ambient humidity is too low (dehydration risk) or that there is a mite infestation. Inspect the animal closely.
- Plant die off: Usually caused by incorrect lighting (too little for tropical plants, too much for succulents) or root rot from overwatering.
- Cleanup crew disappearing entirely: Often caused by substrate being too dry (they desiccate) or too hot (temperatures exceeding 35 degrees Celsius will kill most isopod and springtail species).
When to Contact a Reptile Veterinarian Immediately
A bioactive vivarium does not replace veterinary care. Seek professional help if you observe:
- Retained shed skin, especially around the toes or eyes, that does not resolve with a humidity adjustment and a gentle soak.
- Lethargy, refusal to eat for more than 10 to 14 days, or significant weight loss.
- Visible swelling, discharge from the eyes or mouth, or laboured breathing.
- Signs of metabolic bone disease: rubbery jaw, tremors, difficulty walking. This is a medical emergency.
- Any suspicion of parasitic infection, such as visible mites, unusual faeces, or regurgitation.
A reptile experienced veterinarian can perform faecal parasite screens and blood panels that are impossible to replicate at home. Annual wellness checks are considered best practice by organisations such as the British Veterinary Zoological Society and the Association of Reptilian and Amphibian Veterinarians.
Spring Specific Considerations
Spring is the best season to start a bioactive build for several practical reasons. Rising ambient temperatures mean heating equipment works less hard, reducing electricity costs and the risk of overheating. Longer natural daylight supports plant growth even before supplemental lighting is added. Many reptile suppliers stock cleanup crew cultures and live plants more abundantly in spring, giving you better selection and healthier starter cultures.
However, spring also brings fluctuating temperatures, especially overnight. In temperate climates, nighttime lows in April and May can still drop significantly. Ensure your thermostat is functioning correctly and consider a backup thermometer with a minimum/maximum memory function so you can review overnight temperature swings.
For those who also keep other pets, spring is an active time for enrichment and care across the board. Indoor cat owners may enjoy exploring Spring Enrichment Ideas for Indoor Cats alongside their vivarium project.
Final Thoughts
Building a bioactive vivarium for a leopard gecko or crested gecko is one of the most rewarding projects in reptile keeping. It takes patience, particularly during the cycling period, but the result is a living, breathing habitat that benefits both the animal and the keeper. Start with quality substrate components, invest in a reliable thermostat, choose your cleanup crew and plants carefully, and give the system time to mature before introducing your gecko. With consistent monitoring during the first three months, most owners find that their bioactive setup becomes a largely self sustaining ecosystem that requires only light maintenance going forward.
Frequently Asked Questions
How long should a bioactive vivarium cycle before adding a gecko? ↓
Can leopard geckos and crested geckos share the same bioactive setup? ↓
Are isopods and springtails safe if my gecko eats them? ↓
What is the most common mistake when setting up a bioactive vivarium? ↓
Do bioactive vivariums eliminate the need for cleaning entirely? ↓

Emma Lawson
Practical Pet Care Educator
Practical pet home care specialist — clear, step-by-step guidance grounded in veterinary nursing standards.
Content Disclosure
This article was created using state-of-the-art AI models with human editorial oversight. It is intended for informational and entertainment purposes only and does not constitute veterinary medical advice. Always consult a licensed veterinarian for your pet's specific health needs. Learn more about our process.